Welcome to our guide on ICONSIGN Lash Tint Instructions! This DIY kit offers a semi-permanent solution for darker, fuller lashes and brows at home. Easy to use, it provides professional results with long-lasting color and a smudge-proof finish, perfect for those seeking convenience and salon-quality aesthetics without the hassle. Follow these steps to achieve stunning, tinted lashes and brows effortlessly.
Overview of the ICONSIGN Lash Tint Kit
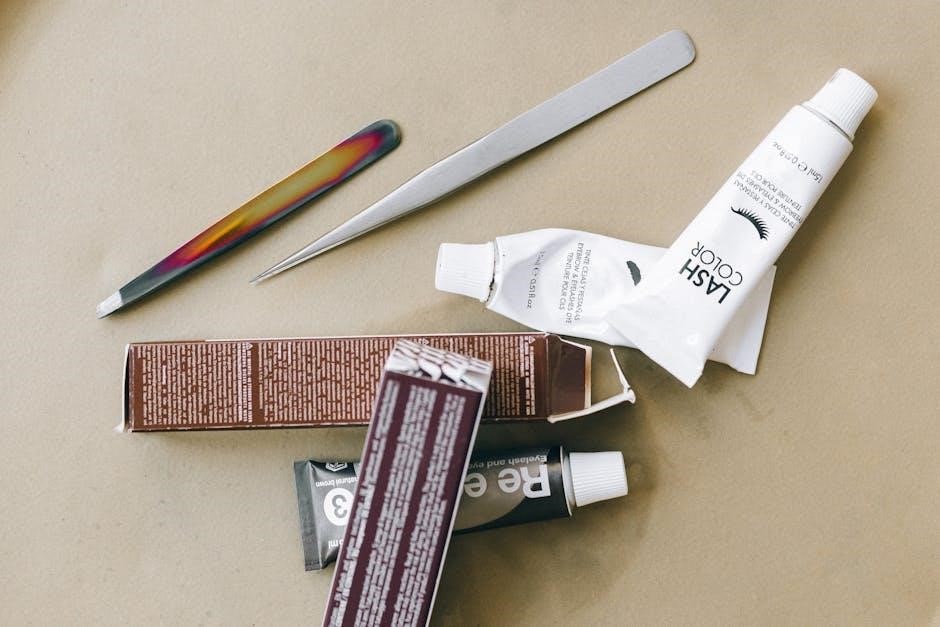
The ICONSIGN Lash Tint Kit is a professional-grade, 4-in-1 solution designed for lash and brow tinting, lifting, perming, and dyeing. It combines convenience and efficiency, offering salon-quality results in the comfort of your home. The kit includes a developer, tint, fixative, and protective barrier cream to ensure safe and effective application. Available in multiple shades, including black, brown, and coffee, it caters to various preferences. The formula is smudge-proof, waterproof, and sweat-resistant, ensuring long-lasting color retention. Suitable for all skin types, this kit is ideal for those seeking a semi-permanent solution to enhance their natural lashes and brows without frequent touch-ups. Its easy-to-follow instructions make it accessible for DIY enthusiasts and professionals alike.
Benefits of Using the ICONSIGN Lash Tint Kit
Using the ICONSIGN Lash Tint Kit offers numerous benefits for achieving stunning, salon-quality results at home. Its semi-permanent formula ensures long-lasting color retention, lasting up to six weeks, reducing the need for daily mascara or brow products. The kit is smudge-proof, sweat-resistant, and waterproof, making it ideal for active lifestyles. The 4-in-1 design combines tinting, lifting, perming, and dyeing, providing a comprehensive solution for lashes and brows. Easy to apply, it saves time and money compared to frequent salon visits. Suitable for all skin types, it enhances natural beauty while offering professional-grade results. The kit’s convenience and versatility make it a popular choice for those seeking a reliable, at-home beauty solution.
Preparation for the Lash Tint Application
Thoroughly clean the application area, ensuring lashes and brows are free of makeup, oils, or residue. Dry the area completely before proceeding to ensure proper tint adhesion.
Cleaning the Application Area
Cleaning the application area is a crucial step before applying the ICONSIGN Lash Tint. Use a gentle cleanser to remove makeup, oils, or residue from the lashes and surrounding skin. Ensure the area is completely dry before proceeding, as moisture can interfere with the tint’s adhesion. For best results, use a microfiber brush or pad to thoroughly cleanse the lashes and brows. This step ensures the tint applies evenly and lasts longer. Proper preparation prevents uneven color distribution and potential skin irritation. Always follow the instructions carefully to achieve optimal results with your ICONSIGN Lash Tint application.
Protecting the Skin Around the Eyes
Protecting the delicate skin around your eyes is essential before applying the ICONSIGN Lash Tint. Apply a thin layer of a protective barrier cream, such as petroleum jelly or a specialized product provided in the kit, around the eyebrows and under the eyes. This prevents the tint from staining the skin and ensures a clean, precise application. Gently pat the cream into the skin, avoiding the hair area. Make sure the barrier is evenly applied but not excessive, as it could interfere with the tint’s adhesion. This step is crucial for maintaining skin safety and achieving professional-looking results with your ICONSIGN Lash Tint.

Step-by-Step Application Process
Follow the ICONSIGN Lash Tint Instructions for a seamless application. Mix tint and developer, apply evenly to lashes or brows, wait as directed, then fix and rinse for long-lasting results.
Mixing the Tint and Developer
To achieve the best results with the ICONSIGN Lash Tint, start by mixing the tint and developer in a 1:1 ratio. Use a clean, small bowl or the provided mixing tray for accuracy. Stir the mixture thoroughly with a microfiber brush or applicator until it forms a smooth, consistent paste. Ensure there are no lumps, as this can lead to uneven color distribution. Once mixed, allow the tint to sit for 1-2 minutes to activate fully before application. Proper mixing is essential for vibrant, long-lasting color. Always follow the instructions carefully to avoid over-mixing, which can weaken the tint’s effectiveness. This step sets the foundation for a successful application, so take your time to get it right.
Applying the Tint to Eyelashes
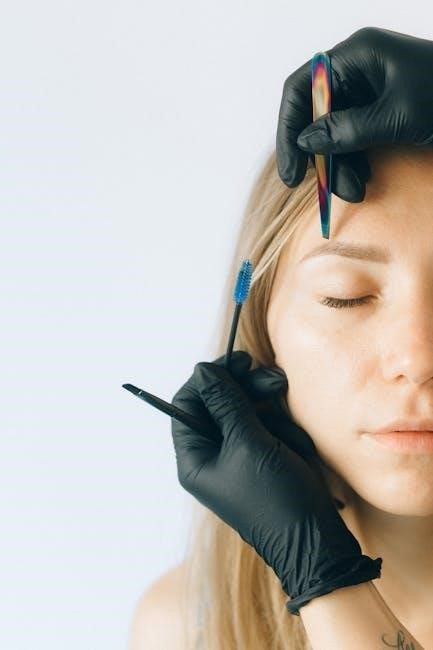
For a professional finish, dip a microfiber brush into the mixed tint and gently wipe off any excess on the rim of the bowl. Starting at the base of your lashes, apply the tint in a smooth, even motion from root to tip. Ensure full coverage by coating each lash thoroughly. Avoid getting the tint on your skin or eyes to prevent staining. Use light, careful strokes to reach the finer lashes at the corners without smudging. Allow the tint to set as directed before moving on to the next step. This method ensures a consistent, vibrant color that enhances your natural lashes beautifully. Be patient and precise for the best results. Proper application is key to achieving long-lasting, salon-quality lashes at home. This step is crucial for a polished look. Always prioritize care and attention when working near the delicate eye area. If needed, use a cotton swab to gently correct any accidental strokes. For optimal coverage, work in sections, starting with the upper lashes and then the lower ones if desired. Use a spoolie or clean brush to separate lashes for an even coat, ensuring no clumps or uneven areas. This technique guarantees a flawless application every time. Proper application ensures the tint adheres well and lasts longer, giving you bold, defined lashes with minimal effort. Following these steps carefully will help you achieve the desired professional finish without the need for a salon visit. By taking your time and being meticulous, you can enjoy stunning, tinted lashes that frame your eyes perfectly. This process is designed to be easy yet effective, making it perfect for home use. The final result will leave your lashes looking fuller, darker, and more vibrant, enhancing your natural beauty effortlessly. Always remember to follow the instructions precisely to avoid any complications and ensure the best possible outcome. With the right technique, you can achieve salon-quality results in the comfort of your own home. This step is where your patience and attention to detail will truly pay off, resulting in lashes that look amazing for weeks to come. By carefully applying the tint, you are one step closer to enjoying the benefits of semi-permanent lash color. Proper application not only enhances the appearance of your lashes but also extends the lifespan of the tint, making it a worthwhile investment for anyone seeking a low-maintenance beauty solution. Always prioritize precision and care when applying the tint to ensure a flawless, professional finish.
Applying the Tint to Eyebrows
For applying the ICONSIGN tint to your eyebrows, start by ensuring your brows are clean and free of oils or makeup. Gently apply a thin layer of protective barrier cream, like Vaseline, around your brows to prevent skin staining. Dip a microfiber brush into the tint mixture, avoiding overload, and begin at the base of your brow. Work in the direction of hair growth for even coverage. Follow the recommended timing, typically 5-10 minutes, to avoid over-processing. After the tint sets, apply the fixation serum and wait a few minutes before rinsing. Be meticulous to avoid mistakes like uneven color or irritation. Refer to the detailed guide for specific instructions and use tools like a spoolie for even coating. Patience and precision will ensure a professional finish with long-lasting results.
Timing the Tint Application
Timing is crucial for achieving optimal results with the ICONSIGN lash and brow tint; For eyelashes, leave the tint on for 5-10 minutes, depending on your desired color intensity and hair type. Coarser lashes may require the maximum time, while finer ones might need less. For eyebrows, the tint typically lasts 5-7 minutes to ensure vibrant color without over-processing. Always follow the instructions provided with your kit for specific timing recommendations. After the tint sets, gently apply the fixation serum and wait 5 minutes before rinsing thoroughly with warm water. Proper timing ensures long-lasting, even color and prevents damage. Be precise to avoid over-tinting, which can lead to darker results than intended. Use a timer for accuracy and rinse carefully to complete the process effectively.
Fixing the Tint
After applying the tint, the fixation step is essential to lock in the color and ensure long-lasting results. Using the fixation serum provided in the ICONSIGN kit, gently sweep it across the tinted lashes or brows. Allow it to work for 2-3 minutes to seal the pigment. Rinse thoroughly with warm water, ensuring no residue remains. Be careful not to rub your eyes or lashes harshly, as this could remove the tint. Proper fixation ensures the color stays vibrant and extends the life of your tinted lashes and brows. This step is crucial for achieving professional-quality results and maintaining the integrity of the tint. Follow the instructions precisely for optimal outcomes.
Aftercare and Maintenance
After tinting, rinse lashes and brows with warm water. Avoid waterproof mascara and harsh products. Gently cleanse daily, and apply a lash conditioner to maintain vibrancy and health.
Removing the Tint Residue
After the tinting process, gently remove residue using a damp cotton pad. Avoid rubbing, as this can irritate the skin or damage lashes. Use a mild, oil-free cleanser to wipe away any excess tint, ensuring the area is clean and free of product buildup. For more stubborn residue, a micellar water or specialized lash cleanser can be effective. Pat dry with a clean towel and apply a soothing lotion if needed. Proper removal prevents skin irritation and maintains the health of your lashes and brows. Always follow the ICONSIGN instructions for safe and effective residue removal.
Maintaining the Tinted Lashes and Brows
To keep your tinted lashes and brows looking their best, avoid using oil-based products, as they can fade the color. Gently cleanse the area with a mild, oil-free cleanser to maintain the tint’s vibrancy. For lashes, avoid excessive rubbing or using waterproof mascara, as this can weaken the tint. For brows, keep them groomed and avoid harsh skincare products. Regular touch-ups every 4-6 weeks will help maintain the desired color intensity. Use a lash and brow serum to keep them healthy and moisturized. By following these care tips, you can enjoy long-lasting, defined lashes and brows with minimal upkeep.
Safety Precautions and Tips
Always perform a patch test 24-48 hours before application. Avoid contact with eyes and sensitive areas. Use protective barrier cream around the eyes. Follow instructions carefully to prevent skin reactions and ensure optimal results.
Following ICONSIGN Instructions Carefully
Adhering to the ICONSIGN Lash Tint Instructions is crucial for achieving optimal results and ensuring safety. Begin by thoroughly reading the provided instructions to understand each step. Perform a patch test 24-48 hours before application to check for any allergic reactions. Use protective barrier cream around the eyes to prevent staining. Follow the recommended mixing ratios and timing guidelines precisely, as over-tinting can lead to uneven color or irritation. Avoid applying the tint directly to the skin or eyes, and rinse thoroughly if accidental contact occurs. Properly timed fixation ensures long-lasting results. Neglecting these steps may result in poor color retention or potential skin reactions. By following the instructions carefully, you can enjoy professional-quality, salon-like outcomes safely and effectively.
Common Mistakes to Avoid
Avoiding common mistakes ensures a successful ICONSIGN Lash Tint application. Not cleaning the lashes and brows properly can lead to uneven tinting. Applying the tint without a protective barrier cream risks skin staining. Mixing the tint and developer incorrectly or using the wrong ratio can weaken the color or cause irritation. Over-leaving the tint beyond the recommended time may result in overly dark or damaged lashes. Applying the tint too closely to the eyes or on already irritated skin increases the risk of adverse reactions. Skipping the fixation step can reduce the longevity of the tint. Shaking the tint mixture excessively can introduce air bubbles, affecting application. Avoid these errors for a safe, professional-quality outcome.
Final Tips for Optimal Results
To achieve the best outcomes with ICONSIGN Lash Tint Instructions, ensure thorough preparation and adherence to the provided guidelines; Cleanse the area meticulously to remove oils and makeup, allowing the tint to adhere evenly. Always mix the tint and developer as directed, and apply carefully to avoid skin contact. Timing is crucial—leave the tint on for the recommended duration to achieve the desired shade. After application, rinse gently and avoid harsh products. Regular maintenance will prolong the color, keeping your lashes and brows vibrant. By following these steps diligently, you’ll enjoy professional-quality results from the comfort of your home. Patience and attention to detail are key for a flawless finish. Remember to follow all safety precautions to ensure a safe and effective experience. Proper aftercare will maintain the longevity of your tint, ensuring your lashes and brows remain stunning for weeks. Optimal results require consistency and careful adherence to the instructions provided. With these tips, you can enhance your natural beauty effortlessly. If unsure, consult additional resources or tutorials for further guidance. Safe application and proper care are essential for achieving the desired aesthetic. Lastly, always prioritize skin safety and product quality for the best outcomes. By following these tips, you can enjoy beautiful, tinted lashes and brows with confidence. These final tips will help you maximize the effectiveness of the ICONSIGN Lash Tint Kit. Remember to stay consistent with aftercare routines to maintain your results. Overall, with attention to detail and proper technique, you’ll achieve professional-looking results at home. These tips are designed to enhance your experience and ensure satisfaction with your lash and brow tinting. Always refer back to the instructions for any clarification and to avoid common mistakes. By doing so, you’ll achieve the desired look effortlessly. The key to success lies in meticulous preparation and careful application. Stay informed and take the necessary steps to protect your skin and lashes during the process. With these final tips, you’re ready to achieve stunning, long-lasting lash and brow color with the ICONSIGN Lash Tint Kit. Remember, practice makes perfect, and following these guidelines ensures the best possible outcome. Keep your lashes and brows looking their best with consistent care and attention. These tips are your guide to achieving salon-quality results in the comfort of your own home. Embrace the convenience and effectiveness of the ICONSIGN Lash Tint Kit with confidence. Your beautiful, tinted lashes and brows await!